
15 July 2026
By Rob — bench hand joiner, time served
Bespoke Ledged and Braced Garden Gate
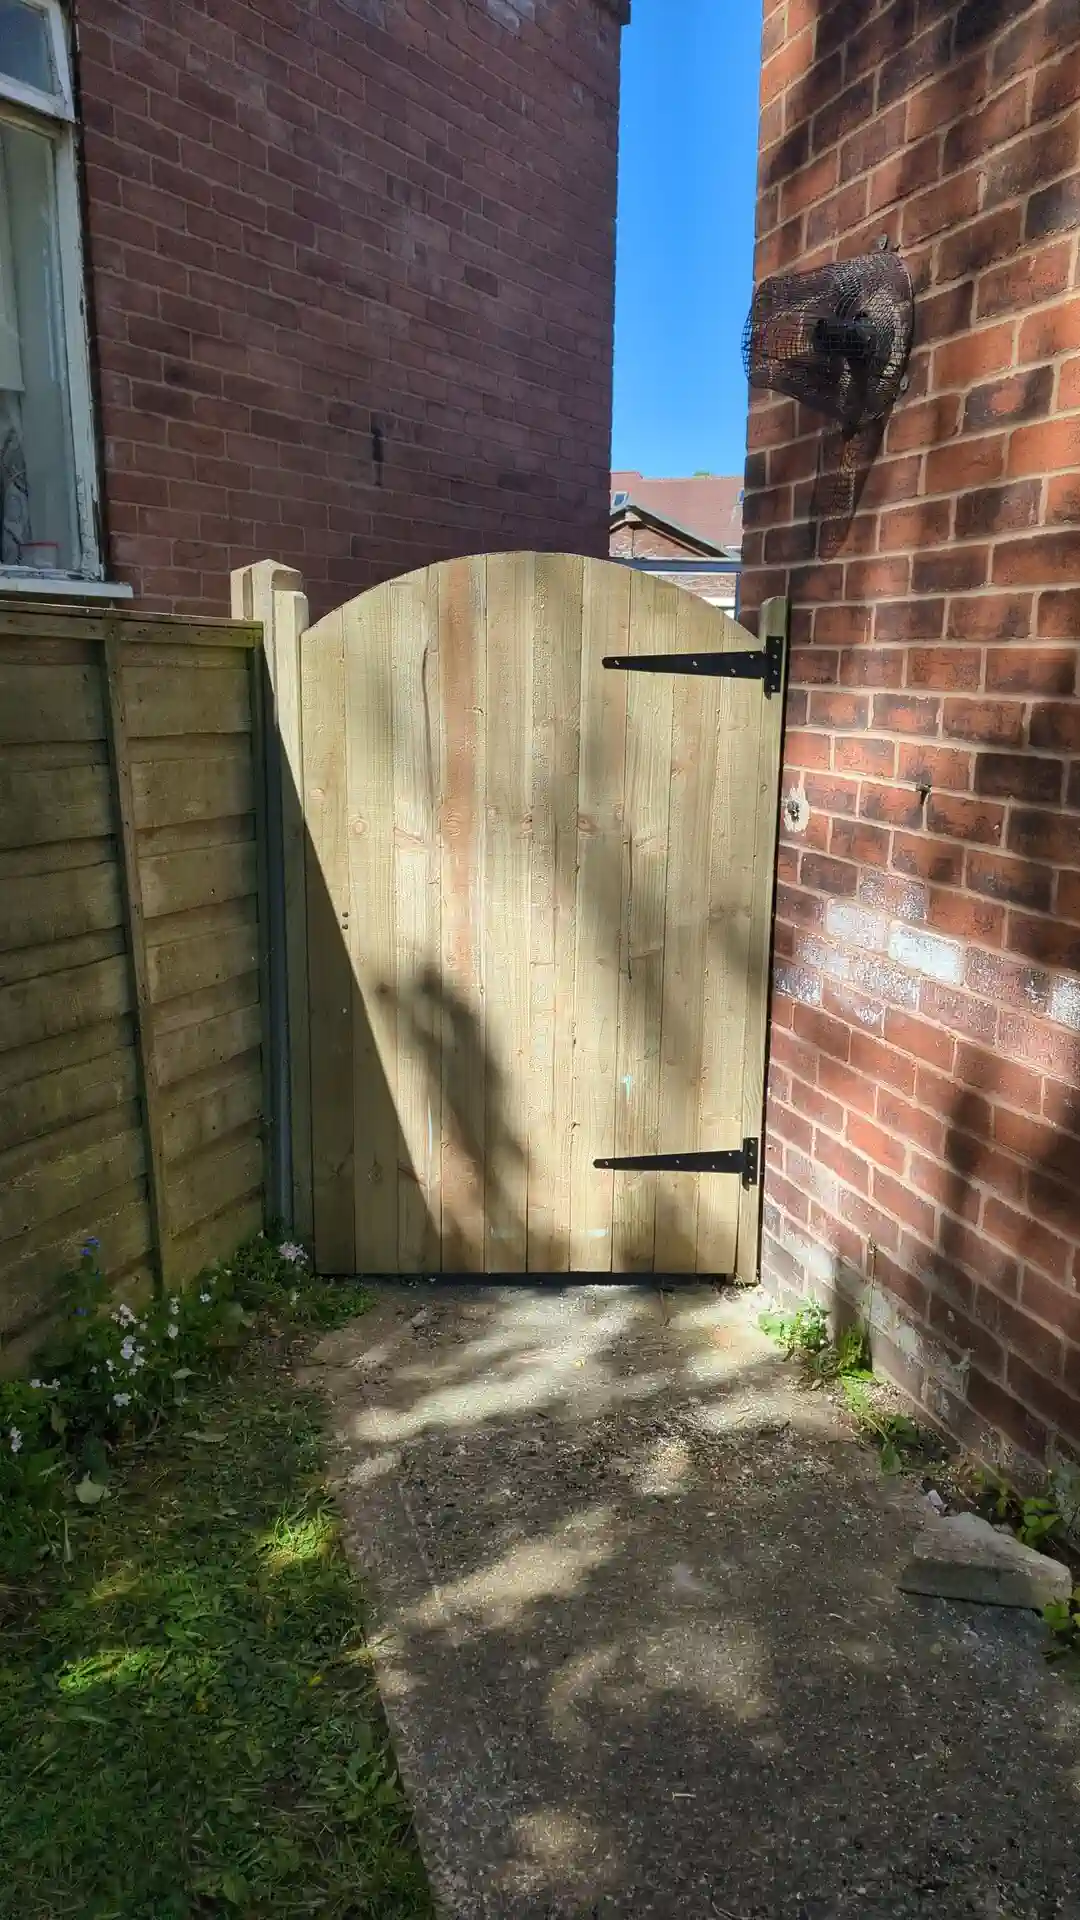
We recently built a bespoke ledged and braced garden gate to replace an old one that had failed. It’s built from 4x1 tanalised timber with an arched top, and made to suit the existing opening rather than a standard off-the-shelf size. It’s a traditional way to build a timber gate, and still the right way for most garden and side gates.
What Is a Ledged and Braced Garden Gate?
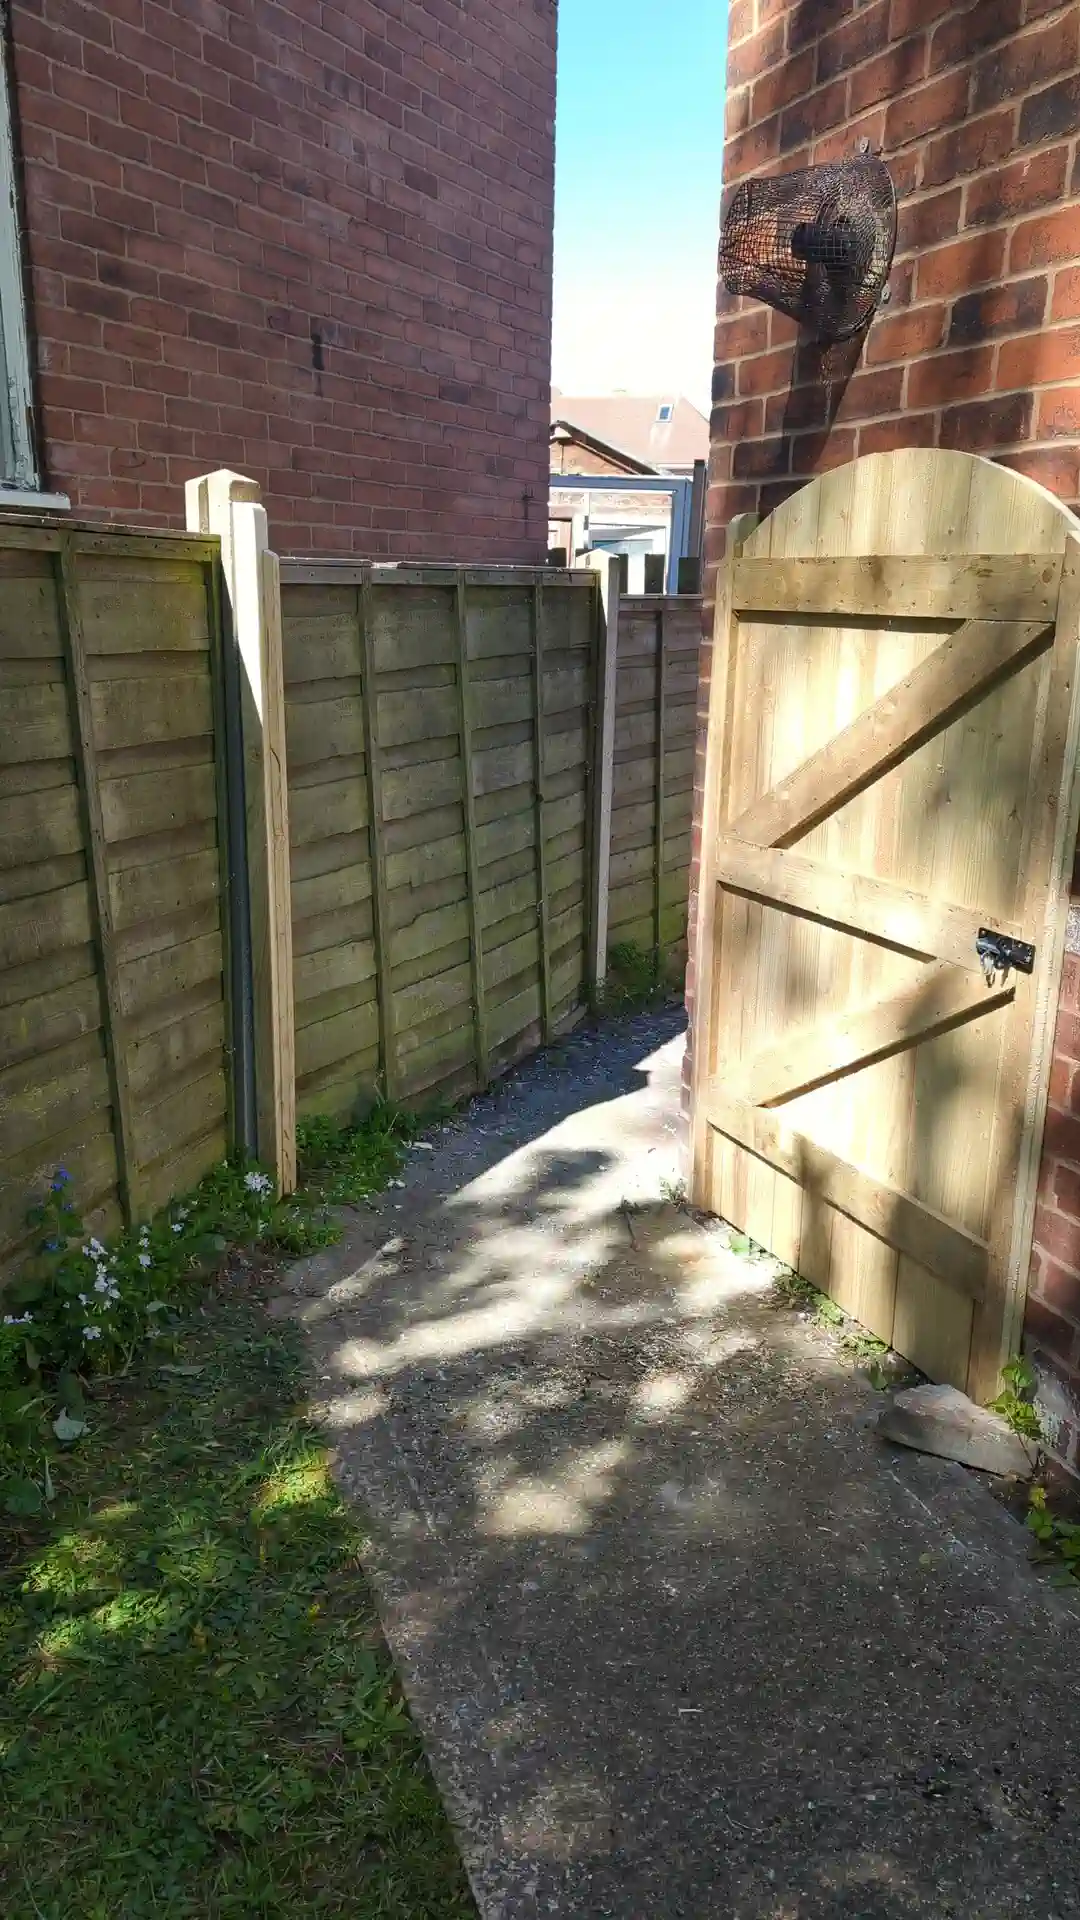
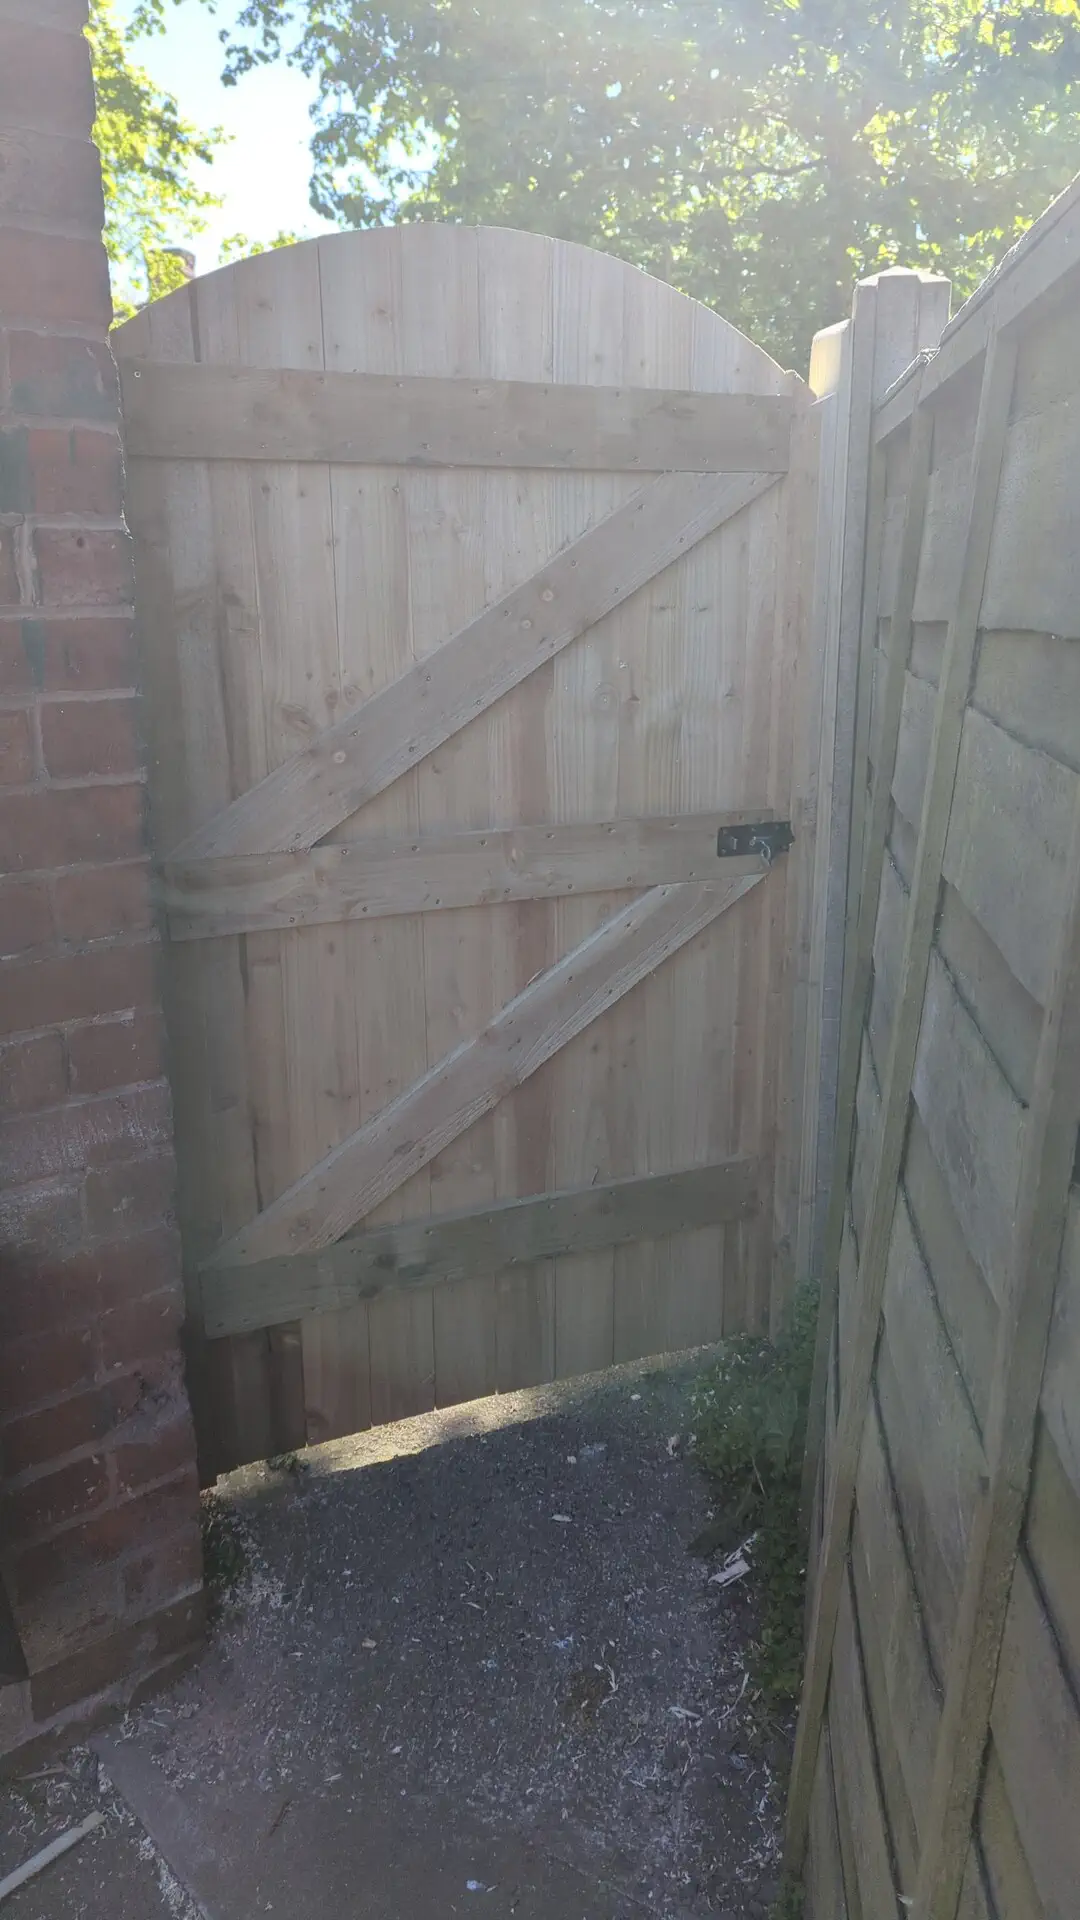
A ledged and braced gate is built from vertical boards fixed across horizontal ledges, with a diagonal brace running between them to hold the frame square. The boards give you the face of the gate, the ledges hold the boards together, and the brace is what actually stops the whole thing racking out of shape over time.
It’s called a ledge and brace gate for a reason — take either part away and it stops working properly. Ledges without a brace will hold the boards together for a while, but the frame has nothing to resist it twisting under its own weight, and a braced garden gate without proper ledges has nothing solid to fix the boards to.
There’s a difference between decorative bracing and a brace that’s actually doing something. A brace fixed the wrong way round, or one that’s more for show than structure, won’t do much for the gate once it’s hung and taking its own weight day in, day out. Proper ledged and braced gate construction means the brace is sized, positioned and angled to carry load, not just to look right.
Why 4x1 Tanalised Sawn Timber Was Used
This gate was built from 4x1 sawn timber — four inches wide by one inch thick, a practical section for this kind of boarded gate. Narrower boards are more cost-effective than wider ones and are less likely to cup as the timber moves outdoors, which helps the face of the gate stay flatter over time.
Tanalised simply means the timber has been pressure treated — the preservative is forced deep into the wood in a sealed vessel, not just brushed onto the surface. That gives it a lot more resistance to rot than untreated softwood, which is why it’s the standard choice for a treated timber garden gate. It’s worth being clear, though, that pressure treatment isn’t a guarantee of zero maintenance. Exposed end grain, particularly at the bottom of the boards, is still where moisture gets in fastest, and the timber will still move seasonally — expanding and contracting with the weather — whatever the treatment. Good construction, decent drainage away from the bottom rail, and periodic maintenance still matter with a 4x1 timber garden gate, tanalised or not.
Setting Out the Arched Top
A plain square-top gate is straightforward to set out — mark a line, cut it. An arched garden gate takes more care. The curve has to be balanced, meaning the same shape and rise on both sides, or the whole gate looks lopsided even if it’s structurally sound.
We marked the arch to suit the width of this particular opening, checked it for symmetry before committing to any cuts, then cut and refined the curve until the line ran clean and even across the top rail. It’s more setting out than a square-top gate needs, and more time cutting and cleaning up the shape, but it’s what gives an arched wooden gate its character rather than it looking like an afterthought bolted onto a standard frame.
How the Gate Was Ledged and Braced
With the boards cut to length, the ledges were positioned and the gate squared up before anything was fixed permanently. Getting the frame square at this stage is what everything after it depends on — fix the boards to a frame that’s slightly out and that error is built into the gate for good.
The diagonal brace runs from the bottom corner nearest the hinges up to the top corner on the latch side. That’s not arbitrary — run that way, the brace works in compression, meaning the gate’s own weight pushes down the length of the brace back toward the hinge post, which is what resists the gate dropping at the latch side over time. A brace running the other way isn’t doing that job, whatever it might look like.
Fixings were placed to hold the boards firmly to the ledges and brace without splitting the timber, and gaps were left between the boards to let them move naturally outdoors without binding against each other as they expand and contract. The hinge side of the gate takes the most sustained load of the whole structure, so that’s where the timber and fixings need to be soundest.
Made to Measure for the Existing Opening
Rather than build to a standard size and trim it to fit, this gate was measured directly off the existing opening — width checked at several heights, since old openings are rarely the same width top and bottom, and the posts checked for plumb and the opening checked for square before any timber was cut.
Clearance was allowed at the hinge side for the gate to swing without binding, clearance at the latch side for the latch to engage properly, and enough ground clearance for the gate to clear the floor through its full swing. We also checked the condition of the posts and whether the existing fixings were sound enough to hang a new gate from, since a well-built gate on a poor post will still fail early.
This is really the whole case for bespoke garden gates over a standard shop-bought one: most older properties don’t have a modern, perfectly square opening, and a gate built to suit the actual opening fits properly first time rather than needing packing, trimming or a compromise on the swing.
Fixing to an Existing Concrete Post
This gate needed to close against an existing concrete fence post rather than a new timber one. That’s straightforward enough when the post is properly plumb, but this one was slightly out of plumb — not enough to notice looking at it, but enough that a timber post bolted flat to its face would have thrown the closing edge of the gate out before a latch was even fitted.
Rather than fight it at the gate, we corrected it at the fixing. A timber post was fixed to the face of the concrete post for the gate to close against on the latch side, but the back of it — the side sitting against the concrete — had to be planed with a compound bevel running the full length of the post, angling across in more than one direction rather than a single straight chamfer, to follow the way the concrete post was out of plumb. That let the timber sit tight and flush against the concrete for its whole length while still leaving a properly plumb face on the front for the gate to close against.
It’s slower than a straightforward flat fixing, checking the angle as you work down the post rather than planing to one fixed line, but it’s the difference between a gate that closes true and one that’s fighting a post that’s out of plumb from day one.
Hanging and Fitting the Wooden Gate
Hinges were chosen heavy enough for the size and weight of the gate, and positioned to spread the load properly rather than concentrating it on one fixing point. They were fixed into sound timber on the gate side and into a post checked to be solid enough to carry the load, since a hinge is only as good as what it’s screwed into.
The gate was hung level, with even gaps maintained around the frame, then the swing was checked through its full travel to make sure it moved freely and didn’t catch or drag anywhere. The latch was fitted last and adjusted so it engaged cleanly, and everything was checked again once fitted to confirm the gate opened, closed and latched properly under normal use.
How Much Does a Bespoke Wooden Garden Gate Cost?
There’s no single figure for wooden garden gate cost, because it depends on a genuine list of variables: the size of the opening, the timber, the design, whether the top is square or arched, the ironmongery specified, the hinges and latch, the condition of the posts, whether the wall or post fixings need attention, access to the site, removal of an old gate, and any finishing or treatment wanted at the end.
An arched, made-to-measure gate like this one takes more setting out and more labour than a standard square gate on a straightforward opening, so garden gate fitting cost reflects that. The practical way to get a sensible view on cost is to send a few photographs of the opening along with approximate measurements — that’s usually enough for an initial view before anyone needs to visit.
Can an Existing Wooden Gate Be Repaired?
Not every gate that’s showing its age needs replacing. Loose hinges, a worn latch, minor sagging, a split board, or a loose ledge or brace can often be put right without a full garden gate replacement, and it’s usually the more economical option where the frame itself is still sound.
Where it stops being worth repairing is when the frame has racked seriously out of square, when rot has got into more than isolated areas of the timber, or when the actual problem is a rotten post below ground rather than the gate. A repaired gate hung from a failing post will just come loose again. In those cases, wooden gate post replacement alongside a new gate is usually the better long-term fix than patching a gate that’s fighting a bad post underneath it. Worth having a proper look before deciding either way — see our garden gate repairs and adjustments for more on what’s usually repairable.
Bespoke Wooden Garden Gates in Pontefract and West Yorkshire
Heritage Joiners builds and fits made-to-measure wooden garden gates in Pontefract, Wakefield and surrounding parts of West Yorkshire, including Castleford, Featherstone, Knottingley and Normanton. Gates are made to suit existing openings, walls and posts, which matters most on older properties where a standard-sized gate often won’t fit correctly.
That covers new garden and side gates, assessing existing posts and openings before building, replacing failed hinges and latches, and repairing existing wooden gates where it’s the sensible option. It’s the same outdoor carpentry and timber gate work whether it’s a full replacement or an adjustment to something already there, and it draws on the same timber suitable for external joinery used across our outdoor work.
Need a bespoke wooden garden gate? Send photographs of the opening and approximate measurements for an initial discussion, or get in touch directly.